
I’m going to continue to use my Woodland Critters Baby Quilt to demonstrate the necessity of using a design wall with all – or at least most – of your quilting projects.
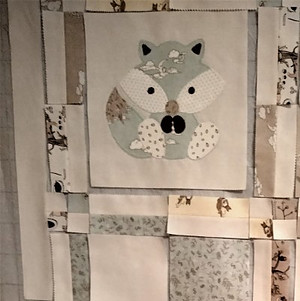
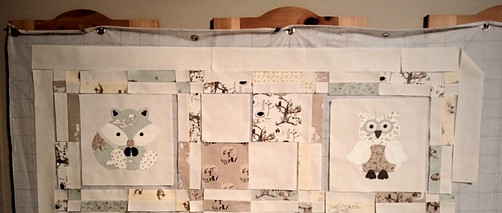
Right now, I have each of the 12 blocks and bazillion pieces for sashing in place, in sequential order and ready for sewing. I do not think I could have done this without using my large design wall. For anyone interested in using this pattern I would highly suggest using a design wall as there really is no better way to accurately visualize how each block or color relates to another than to have it placed in a vertical position and at eye level.
Our eyes are made to work together – each eye perceives an image independently but it is our brain that fuses these images into one. Now think about where your eyes are located – side by side along a horizontal plane. Leaning your head even slightly to one side alters the perception of the object you are viewing. It may be too subtle to notice however, if you think about the difference in the comfort level of your eyes when watching a TV program lying on your side then sit up and notice the difference. When our head is in an upright, mid line position we are able to more accurately perceive objects that fall within our line of sight. Your perception or point of view changes and things just look more “normal”. We are able to focus our attention on how things look as opposed to trying to make things look “right”.
Before I invested in a design wall or even knew such an animal existed a table-top or floor was the only surfaces I used to organize and layout a fabric design. Thinking back I realize I used a considerable amount of time trying to get things to “look right”. Sometimes, I never got things to “look right” because I was not allowing my eyes and my brain to naturally work together. A design wall would have solved that!
Design Wall #1
In my sewing room I actually use two different sized design walls. For the large one I first attached a wooden screen (that I’ve had for over 20 years and have never actually used) to one wall in my sewing room making sure the top of the design wall would not be higher than my range of reach. On this I measured the distance between the grommets on the commercially available “design wall” and screwed in small hooks. Next, I simply hung this fabric from the hooks.
This “temporary” design wall has been up about 2 years now. My thinking: see if I am able to live with something like this on my wall and if so, change out the re purposed screen for a proper wooden border. This temporary installation gives me the freedom to remove it from the frame, fold it up and take it with me to another room or out-of-town quilt retreat.
In the image above you can see this design wall is simply vinyl backed felt (same thing as a vinyl table cloth) with 7 or 8 grommets placed across the top. The vinyl back also has a grid to help with accurate fabric placement. At first sight this appears to be a great idea however, I have to admit I don’t use the grid at all and here is why. The grid is marked in 2″ squares. Most quilt pieces, in order to accommodate a 1/4″ seam allowance, are not cut into whole number dimensions – they will be 4 1/4″ or 5 7/8″ . Additionally, many quilts I make use fabric dimension of more than one size, throwing off the grid system making it basically useless.
You can see how my pieces look on this design wall – they don’t correlate with any grid line and because of the varying dimensions between the sashing, squares and blocks, some pieces overlap while a gap is seen between others.
It looks messy but that’s no problem. The felt-type fabric used on the wall allows the quilt fabric to “stick” and temporarily position and re position until you have everything lined up the way you want. Having all fabric pieces easily accessible and in correct order when ready to sew is both a time saver and stress reducer.
Design Wall #2
My large design wall works great but there are times when I really don’t need that much area to work with. Then there are times when I’d rather do my cutting downstairs on my kitchen island. I have all the light and space I need and plenty of good spots to hang a smaller design wall.
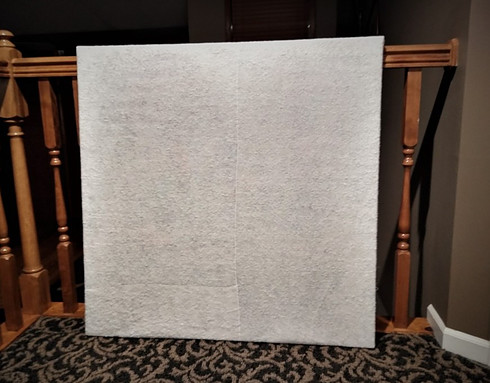
Next question, where is this smaller design wall going to come from? I sense another DIY project brewing. Sure enough, a trip to the basement yielded a piece of canvas “art” leaning against a wall and serving no other purpose than to collect dust. All that was needed was some “sticky” fabric and I have LOTS of batting scraps that fit that bill and a staple gun.
The image below shows how I covered this canvas with batting (I zigzag stitched three remnants together) then wrapped it to the back and stapled it all the way around. Now I have a smaller design board for use with all my smaller quilts or to organize fabric pieces of a larger individual block. It’s extremely lightweight, easily moves from room to room and can be stored out of sight by sliding under a bed, behind a tall cabinet or in a closet.
In summary, here are the top 5 reasons you need a Design Wall:
1) Helps to accurately visualize the overall effect of colors and shapes and their relation to one another.
2) Vertical placement on a wall takes up very little space – a portable wall is easily stored out of sight.
3) It can easily be a permanently (semi-permanently) mounted on a wall and always available when you need it
4) Can be portable – there are many other variations, I have only shown two options.
5) Allows you to use and re purpose unused items sitting in your basement or closet collecting dust.
I hope you find the above information helpful if not somewhat enlightening.
As I wrote this I had a question – has anyone used a design wall for other sewing projects? For sewing garments for example?
If you use a design wall please share your thoughts and images in the comments section below!
I didn’t know that design wall can be done this way! All the time, I will just buy wallpaper and decorate my wall. This is something very interesting that you share. How can I buy materials to DIY this? Can you make a video to show your step-by-step on this? I would really love to share.
Hi Florence,
It seems I’m always looking for ways to use and repurpose unused items in my home and anything that improves the quilting process as well. When I figure out how to make a video that is worthy of watching I will certainly post it! I think adding video to any of my posts would be a bonus.
I am only beginning to be interested in quilting and am more interested for my wife’s sake as she is looking at quilts now that she has begun to master sewing as a craft. The design wall ideas you have look like something I could build for her fairly easily. Is there a minimum or maximum size needed? I have used similar screens for jewelry making and display, have you found other craft ideas for the design walls when not in use quilting?
Hi Andy
My first ‘design wall’ was purchased from a craft shop – folded into a square about the size of table cloth. In fact, that is what it reminds me of – a felt backed vinyl tablecloth with grommets across the top.
This what you could do – get a tablecloth, place the vinyl side against the wall and tack it up on a wall. If it’s in an unused area just keep it up. As far as size there is no minimum but I not go smaller than 36″ x 36″, but that really depends on the size quilt tops either of you will be making. If its rather large that’s no problem – only use what space you need but if it is too small it won’t be very useful.
A design wall like this could be used for other fabric projects – maybe to layout pieces to be made into a garment?
Hi Susan. I came across your site by accident. I was looking for quilting blogs for my wife. She’s new to quilting and would like to learn more about it. Every 3 or 4 months we get a visit from a niece who is a quilting wiz kid, but she lives a long way away. There are no local quilting clubs in our area so I suggested she find some information on line. Unfortunately she’s not very computer Savvy, so I am having a look for her, trying to find beginner tutorials. I was fascinated by your blog on Design Walls. What a fantastic idea. At the moment she is trying to piece items together on a rather small table. I will tell her about your site and she can have a look for herself. Thanks Jim
Hi Jim
Thank you so much for your comment. It seems I never have table space for quilting. Before I learned about using a design wall I was laying everything out on the floor – not my favorite place!
And thank you for directing your wife to my site. I hope she finds some good information and inspiration!
HI Susan.
I was enlightened by this idea, it is really clever and I have never seen anyone do it this way, it looks very attractive as well. I normally use wall paper or paint but that becomes a fixture to your house so there is no taking it with you when you leave. this is perfect cause all your hard work does not get left behind for someone else to enjoy. I love how you have demonstrated the simplicity and effectiveness at the same time. I am definitely going to look into this.
It would be really great if there was a step by step guide to show you exactly how to put this together.
Hi Carmen
Thank you for your comments. The design wall I describe isn’t actually intended for use a replacement for traditional paint or wall coverings – it is simply a better way to figure out where you want to place your quilt pieces before sewing everything together. It is a stand-alone item that can be moved from place to place or stored away when not in use.
I agree with you. A design wall gives you a great birds eye view of your project. I personally am not into quilting, but my sister loves it and always want my opinion. She does not use a design wall, but I think she will definitely benefit from getting one.
Can you maybe recommend dimensions for design walls? I just want to give her an idea on how big it should be.
Thanks for sharing your brilliant idea with us!