

… And the “Train” that brought me to my destination.
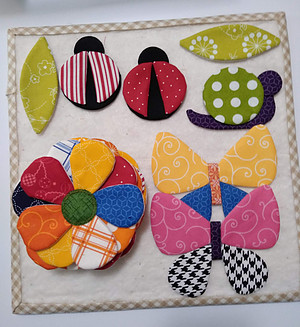
The road from here: (Kimberbell Basics Spring Charm Pack)

To Here:
And finally, to the finished quilt:

wasn’t all that long but I somehow managed to find at least one hundred ways to turn what was originally a straight stretch of smooth, freshly paved highway into a labyrinth of twists, turns, U-turns and roundabouts. So many little “detours” that I am beyond surprised that I am able to sit here today and declare: “The Garden Quilt Is Done!”
As I mentioned in a previous post, this quilt – my version of this quilt – is one that can teach just about EVERY quilting and sewing technique that you will EVER use!
The minute I laid eyes on this pattern and read the word “Trapunto” I knew I had to make this.
I’m a total sucker for any dimensional art – embroidery, applique, bargello, crewel, beading – you name it.
My next thought, “I can use this pattern to make a quick and easy Sweet 16 quilt for my oldest granddaughter.” This was back in March, 2021. The time stamp on this post shows the time line to be not-so-quick!
So, what about the easy part? Actually, nothing about this quilt is difficult or complicated but thinking things through and trying to answer the many questions that pop up…oh my. At times, making a decision between A or B was too overwhelming to continue. Doing nothing often takes more time than doing something that has to be taken apart and redone.
Each situation however, was not time spent in vain. These were the moments where I learned lessons and techniques that, I feel certain, will prove useful in future projects.
To Quilt or Not to Quilt
That was the biggest decision of all. Do I quilt the entire background first and sew on the applique elements last or go ahead with the trapunto technique and sew on the applique elements first and then quilt around then?
This question then leads to the next: “What appearance do you want the quilt front and back to have?
My answer (and clue as to why I had such a hard time finding the right answer): I wanted the front and back to have the same diamond quilt pattern but the applique elements without quilting. It should be easy to do that – quilt the background to the back then sew on each applique element individually!
Best answer: To hand sew applique elements after quilting, you’d better have a good sturdy frame – something I do not have. Sewing the elements around the perimeter was not too terribly difficult. It’s the ones in the middle of the quilt that become the trouble makers. My hands are small and the quilt is rather large.
At this point in my decision tree I was still using my Janome New Home (Volkswagen version). I auditioned a couple of samples and decided I liked the unstitched appearance around the edges much better than the zigzag or blanket stitch.
I always favor a softer appearance however, my decision was largely based on the fact that my Volkswagen sewing machine could not be depended upon to create even stitches. The blanket stitch wasn’t too bad but having to stop and turn at every stitch was very time-consuming and would invariable lead to inconsistent stitches.


My decision tree also led me to the conclusion that I cannot quilt a quilt this size on this machine so my next “detour” was locating a long arm quilting service. This search resulted in either a long wait time, long turn around time or no call backs.
Biting the Bullet (or sewing needle!)
As much as I appreciate the beauty of long arm quilting, there was something about sending “my baby” to a stranger to quilt that I wasn’t comfortable with. Maybe it was the fact that I was making this quilt for my granddaughter and I wanted every aspect of this quilt to be from me to her.
That was the final straw – I knew I had to stop procrastinating and go ahead and make the purchase I’ve been contemplating all along. At this pint in the project it had become abundantly clear there were far more reasons to purchase a new machine than not!
Turns out, it was also the perfect time for a short road trip to The Missouri Sewing Machine Co. Armed with the hubs $$ and muscles, we walked in with an intention and walked out with a Janome Memory Craft 9450.


This is it…the “Train” mentioned in the opening line of this post refers to this wonderful machine. Without it, I would have never reached my destination with BOTH quilts finished and on their way to my granddaughters.
My Janome has been in its new “home” just over a month and already, it has more miles on it than my 8 year old car!

There is so much to say about this machine that it deserves a dedicated post. So, be on the lookout – In a week or two I’ll be posting full review complete with what I like, don’t like and maybe even new images of my sewing room re-design!
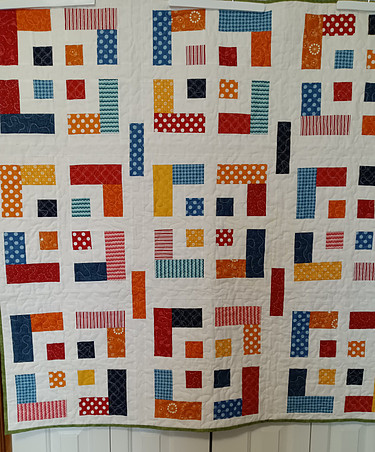
I’ll finish this post with an image of the “Little Sister” quilt made from the leftover scraps from “Maria’s Garden” quilt. It’s a much smaller quilt but have never sent one sister something and not the other. I only wish I had thought to do this sooner and had the time and fabric to make something nicer.
Lanna’s Little Sister Quilt
This is IT! The last post about this quilt, the quilt that inspired this quilt, and these fabrics.
A brand new light and an entirely new destination are on the horizon.
The following are the first few stops along the way:
1) Janome MC 9450 Review
2) Making a Stress-Free Quilt Sandwich
3) Revisiting Woodland Critters
Thanks for stopping by and feel free to share what destinations your quilting travels take you!

Thank you for your post regarding your Janome. How old is your machine? I am beginning to think that 10 years is the max for a computerized machine.
I’m finding as the new machines come out they are only lasting half the time of my original ones. Last machine only lasted 2 years before problems arose. Unfortunately, it has been back several times and still has the same problems only worse. Also, computers are update extremely fast these days and screens ‘burn out’ and can’t be replace.
I started sewing 72 years ago on a treadle that is probably still going somewhere. And have had a few machines.
To get off the pros and cons of sewing machine for a minute. My husband said we (probably my age) are looking at purchasing machine the wrong way. He buys a car – good reconditioned with a 3 – 5year, warranty- as good as a new one. A NZD20,000 car he expects to last for 10 years. Good, so he needs to put away NZD2,000 every year to replace it. If it lasts longer, you still put the money away for the replacement. And that is the way we should be thinking of our sewing machines seeing that they are computers and generally made of plastic.
How long should a domestically used machine last when used to make clothes and quilts?
Why are they so costly, when if you compare them, they nearly all have basically same fancy stitches, buttons, bells and whistles. Many of them are made by the same companies. In fact, can you even find the owners of some companies or their headquarters? So why the high prices?
I would l like to be able to a post website re my machine/s, however, don’t know how to.
I wish more people would be honest about their sewing machines.
Thank you