Learning how to bind a quilt so it has a neat, professional look comes down to six things: a square, trimmed edge, strips cut to the right width, crisp mitered corners, a hidden strip join, and an even machine stitch-down. Get those right and a binding sewn on a home machine looks as polished as one bound by a professional.
You have already done the hard part. The top is pieced, the quilting is finished, and the quilt is sitting on your table looking a little rumpled and not quite done. Binding creates the frame around all that work, so it is worth a bit of care. This tutorial covers the details that separate a good edge from a great one, and none of them need special equipment.
What does a professional-looking quilt binding actually look like?
A professional binding is the same width all the way around, sits flat, and is filled right to the fold with batting. It doesn’t have to picture perfect but the quilt with bound with sharp corners, and a neat diagonal fold, on both the front and the back is the finishing touch that makes a quilt stand apart from the rest.
Flip the quilt over and check the back as well. The folded edge should cover the stitching line with no gaps, and the binding should look the same width on both sides.
When a binding doesn’t have that even, crisp appearance, the cause is nearly always one of these:
- The quilt edge was never squared up, so the binding follows a wobbly line.
- The binding was stretched while it was sewn on, which causes ripples.
- The corners were folded by guesswork, so they bulge or gape.
- The strip joins sit in the middle of a side and show as a thick bump.
- The stitch-down wanders on the front and misses the fold on the back.
Each of these has a straightforward fix, and the sections below take them in the order you will meet them.
How do you prepare the quilt edge before you bind?
Properly preparing your quilt for binding, as I have learned through many trials and errors, is the step that can make or break the look of your binding. Since the process of quilting the quilt sandwich will pull the fabric in, the edges are never straight, and the corners are rarely true right angles. Because the binding can only be as straight as the edge you attach it to, following the steps listed below to square up your quilt first will pay off in the end.
Over the years a quilter will develop his or her own style and technique for attaching binding. And there is really no absolute right or wrong way to attach binding. Hundreds of tutorials exist out in the wild that cover this subject but they each pretty much say the same thing. The technique I use is a little bit different. It actually adds a couple of steps but for me, the extra time and effort is more than worth it.
Lay the quilt flat on a large table or the floor and smooth it without stretching it. Then work through this sequence:
1) Stay Stitch the Edge. When the quilting is finished, do a basting stitch at 1/8″ from the edge all the way around the perimeter of the quilt. Christa Watkins calls this a “victory lap”!
2) Zigzag the Edge. Using this basting stitch as a guide, do a second “victory lap” around the quilt but this time, do a zigzag stitch that measures a scant 1/4″ width from the basting stitch to the outside edge. (If you happen to have a serger, give it a try with your quilt. I know a couple of people who do this however, I don’t have a serger so I can’t say with 100% certainty how well this works).
3) Pick your trim line. Lay the quilt of a flat cutting surface. Use the zigzag stitch as a guide trim just immediately to the outside edge of the zigzag. The zigzag edging compresses the edge making it so much easier to line up and find the true center of each side and to bring the corners together. For me, it removes a lot of uncertainty and takes the guesswork out of getting the edges straight and true right angles at the corners.
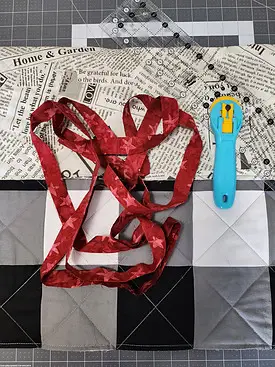
4) Trim the first side. Line up a long acrylic ruler with your trim line and cut with a rotary cutter, removing the extra batting and backing so all three layers are even. A sharp, fresh blade is worth having here, and the guide to choosing a rotary cutter for quilting can help if yours is dragging through the layers.
5) Square the corners. Place a large square ruler in each corner and trim so the corner is a true 90 degrees. Do not trust the corners of the quilt to be square just because the top was pieced carefully.
6) Check your measurements. Measure the quilt across the middle in both directions and compare it with the measurements along the edges. They should match closely. If the edges are longer than the middle, the binding will ripple, so ease the edge in or retrim.
Finish by trimming loose threads and clipping any batting fluff along the edge. Stray threads show through light binding fabric, and batting beards are surprisingly good at escaping.
*NOTE* While squaring up, there will very likely be areas of zigzag stitching that were cut off. It’s no biggee – just take the quilt back to the machine fill in the missed areas with zigzag stitching. If the gaps aren’t too large, you could just leave it as is.
How wide should you cut binding strips, and how much do you need?
Cut double-fold binding strips 2 1/4 to 2 1/2 inches wide, and calculate the total length as the quilt’s perimeter plus about 12 inches. A 2 1/2 inch strip is the usual choice for most quilts. A thinner batting works well with 2 1/4 inches, and a thick batting or a loftier quilt may need 2 3/4 inches or more so the binding can wrap around the extra thickness.
To work out how many strips you need:
- Add up the four sides of the quilt. For a quilt measuring 60 by 80 inches, that is 60 + 80 + 60 + 80 = 280 inches.
- Add about 12 inches for the corners, the joins and the overlap at the end. That gives 292 inches.
- Divide by the usable width of your fabric, which is typically around 40 inches once selvages are removed. 292 divided by 40 is 7.3, so round up to 8 strips.
- Multiply the number of strips by the cut width to find the fabric needed. Eight strips at 2 1/2 inches is 20 inches, so 5/8 yard covers it.
If you are buying fabric specially for the binding, rounding up a little is cheap insurance, since cutting too few strips means dealing with mismatched dye lots later.
Straight-grain strips are fine for a quilt with straight sides. Cut bias strips if the quilt has curved or scalloped edges, because bias fabric stretches enough to follow the curve. Bias strips also need extra care to keep from stretching as you sew.
How do you join strips and attach the binding to the quilt?
Join the strips with diagonal seams, press the whole length in half lengthwise, and sew it to the quilt with a walking foot and a 1/4 inch seam. A diagonal seam spreads the bulk over a longer distance than a straight seam, so it does not create a lump when the binding is folded over the edge.
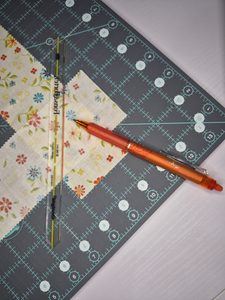
Joining the strips
- Lay two strips right sides together at a right angle, forming an L with the ends overlapping in a square.
- Draw a diagonal line from the top inside corner of the overlap to the bottom outside corner, and sew right on that line.
- Trim the seam allowance to 1/4 inch and press the seam open.
- Repeat until all the strips are one long length, then fold the strip in half lengthwise with wrong sides together and press.
Pressing the seams open matters here. Seams pressed to one side add layers, and layers show up as bumps in the finished edge.
Attaching the binding
Start on the bottom edge of the quilt, away from a corner, and leave about 10 inches of loose tail at the start. Line up the raw edges of the binding with the raw edge of the quilt top, and begin sewing with a 1/4 inch seam. A walking foot is the best tool here because it feeds the quilt top and the binding at the same rate, so one layer does not creep ahead of the other.
Let the binding feed through naturally. Resist the urge to pull it taut, because stretched binding shortens back to its normal length after sewing and puckers the quilt edge. It also helps to support the weight of the quilt on the table beside the machine so it does not drag the fabric sideways.
How do you miter a corner that lies flat every time?
Stop sewing exactly 1/4 inch from the corner, fold the binding straight up at a 45 degree angle, then fold it back down even with the next edge and start sewing from the very edge. That fold is what creates the miter, and the key is to get the stopping point right.
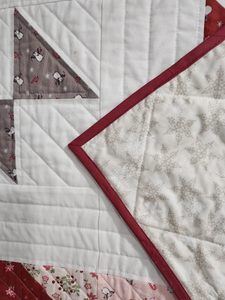
To find that point reliably, mark it before you begin. Use a small ruler or a pencil mark on the quilt top to show where the 1/4 inch seam lines meet at each corner. Sew until the needle is at that spot, then follow these steps:
- Backstitch a stitch or two and cut the thread. Take the quilt out of the machine.
- Fold the binding up and away from the quilt, so the fold forms a 45 degree angle and the raw edge of the binding lines up with the next side of the quilt.
- Fold the binding back down, with the fold lying exactly along the edge you just finished. The top of this new fold should be level with the raw edge of the quilt.
- Begin stitching at the edge of the quilt, backstitch, and sew down the next side with a 1/4 inch seam.
A small pleat of fabric will have formed at the corner, and that pleat is the material that becomes the mitered fold when you turn the binding to the back. When you wrap the binding, push the fold into a neat diagonal on the front first, then fold the next side over it so the miter forms on the back automatically.
If your corners look lumpy, the usual cause is either stopping too early or too late, or folding the binding slightly off the quilt edge. Unpick and try again. A single corner takes a couple of minutes to redo, and you will usually get the knack on the second try.
How do you join the binding tails so no one can find the seam?
Join the tails with a diagonal seam, just as you joined the strips, and place the join along a straight side rather than near a corner. When it is done properly the join looks the same as every other strip seam in the binding.
Stop sewing about 12 to 15 inches before you reach your starting point, leaving the end loose, and backstitch. Then do this:
- Lay the quilt flat and smooth out both binding tails so they sit along the edge, overlapping each other.
- Trim the tails so that the overlap equals the cut width of your binding strip. For a 2 1/2 inch binding, the overlap is 2 1/2 inches.
- Open out both tails. Place them right sides together at a right angle, as you did when joining the strips.
- Draw a diagonal line across the overlap and pin along it.
- Before you sew, lay the joined binding against the quilt edge to check that it fits. It should lie flat without being stretched or left slack. Adjust if needed.
- Sew on the line, trim the seam to 1/4 inch, and press it open.
- Refold the binding in half and finish stitching it to the quilt across the gap.
The overlap measurement gives the binding the right length once the seam allowance is taken into account, so it neither buckles nor pulls tight. If you are nervous about the join, test it with scrap fabric to see how the diagonal works before you cut your real binding.
Should you finish binding by hand or machine?
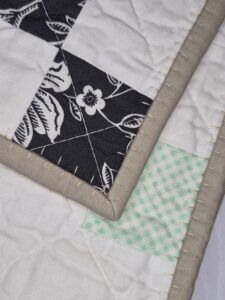
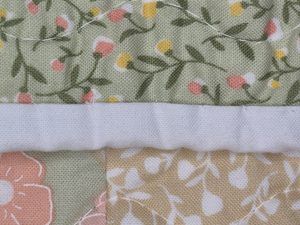
Both give a professional result, and which one is right depends on the quilt and how much time you have. Hand stitching gives an invisible finish, and suits show quilts or heirlooms. Machine stitching is much quicker and is more durable for quilts that will be washed and used often. Below is an example of an early quilt I bound using hand stitching. It’s by no means perfect but if it’s the authentic handmade look you’re after, this is one way to achieve that!
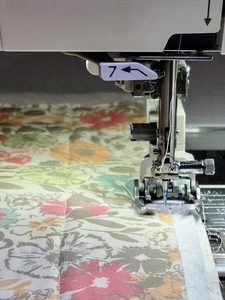
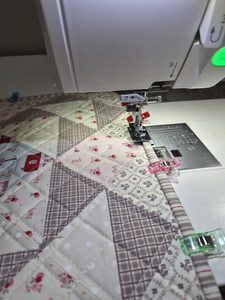
For a machine finish, the cleanest results come from reversing the usual order. Sew the binding to the back of the quilt first, then wrap it to the front and stitch it down from the front side. That way the line of stitching you see is the line you control, and you can run a straight, even row along the binding’s folded edge. The example shown below is my go-to method to attach binding on my machine. Any slight wander lands on the back, where it is much less noticeable.
Tips for a neat machine stitch-down:
- Pin or clip generously, especially at the corners and the joins. Wonder clips work well because they do not distort the thickness of the binding the way pins can. Acorn products have a wonderful temporary basting glue that I often use first then clip the binding in place and stitch. I’ve yet to have binding shift when I use glue and/or glue and clips.
- Use an edgestitch foot or a walking foot with a guide and line the guide up with the binding’s folded edge.
- Choose a matching thread for the top and use a neutral or matching thread in the bobbin so the back is not distracting.
- Use a slightly longer stitch length than for piecing. Many quilters like about 3 mm, which looks tidy on the edge and does not bunch up.
- Sew slowly, (the walking foot is a walking – not running foot!) and stop with the needle down to adjust the binding as you go.
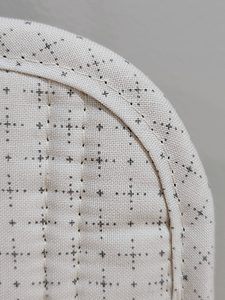
To finish, I prefer to wrap the binding from front to back, glue, clip and stitch in the ditch from the front. Using glue ensures the binding on the back covers the line of machine stitching. When the moon and stars are aligned, the back looks almost as good as the front!
Why is my binding wavy or puckered, and how do I fix it?
Wavy or puckered binding is almost always caused by uneven tension between the quilt edge and the binding: either the binding was stretched while sewing, or the quilt edge is longer than the middle of the quilt. Both are fixable.
Here are the common causes and what to do about each one:
- Rippling along the edge. The quilt edge is longer than the quilt’s middle, or the quilt was stretched while it was being quilted. Unpick the binding on that side, trim the edge straight, and reattach it, easing the quilt edge slightly as you go.
- Puckers in the binding itself. The binding was pulled while it was sewn on and then relaxed. Sew with a walking foot and guide the strip without tugging.
- Binding that is loose and floppy. The quilt was trimmed too tightly, so the binding is not filled with batting. Next time, trim so the batting reaches the fold, and consider cutting the strips slightly narrower.
- Binding that is too tight and curls the quilt. The binding strip is shorter than the edge. Check your measurements and make sure you did not pull it taut.
- Gaps on the back. The binding was not wrapped far enough to cover the stitching line. Fold it over a bit more, or cut the strips wider next time.
An EASIER fix is to prevent any of the above from happening in the first place! Just add these two steps to prepare your quilt: 1) Zigzag around the perimeter of the quilt and 2) Glue and clip binding in place before stitching on the back and again before stitching on the front. Problems may still occur now and then but not with the frequency and severity as without my added steps.
*Note * When using a seam ripper is the only answer, unpick only the affected section rather than the whole side. Pin it to the table flat and re-sew with the quilt supported so nothing drags. Pressing the binding before you wrap it also helps the folds stay sharp.
Finish the edge, then keep the conversation going
Once you have the order of steps down, binding becomes the quickest part of finishing a quilt, and it is the part everyone looks at first. A square edge, a steady seam and a few clips take you most of the way there.
Now that you have read this far, I invite you to click the button below and download my FREE Quilt Binding Toolkit. It has all the binding information found here but condensed into quick reference guide you can print out and keep at your side. And if there is one binding step that still gives you trouble, whether that is the mitered corners, the join or the stitch-down, leave a comment below and tell me which one. Your question may well be the subject of a future post.