
Part Two of a Three Part Series:
How To
Make Your First Quilt.

Since this phase involves using what is known as a quilt “sandwich”, I have divided each section using food terminology. As a side benefit, you may also see a correlation between making a quilt and following a cooking recipe or just about anything else. There is a process and a sequence – if followed – will bring you desired results, every time.
The Recipe
The term “quilt sandwich” refers to the appearance of the quilt with the batting (plain filling) layered, or sandwiched between the two pieces of pretty fabric – the top and the backing.
For our new quilt we will place our layers so the “filling” is on the bottom with the two fabric layers on top but in the last step we will turn the entire quilt inside-out which will produce the typical “sandwich” effect.
The following items or ingredients are both helpful
and necessary to complete this part:
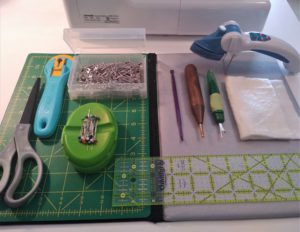
v Sewing machine
v Smooth, flat surface – tabletop or large floor area
v Batting
v Backing fabric
v Rotary cutting mat
v Rotary cutter
v Quilting ruler
v Straight pins or Quilting safety pins
v Ironing board and Iron
The Pantry
To put our quilt sandwich together there a few items we need to retrieve from the cupboard or wherever it is you store your quilting and sewing tools and notions.
1. A large continuous flat surface area – a table top, floor – any place large enough to spread out the quilt nice and flat.
2. The first layer to go directly on the table or floor will be the batting. This is the soft, fluffy inner layer that gives the quilt softness and warmth.
3. The next layer will be the backing – this is the fabric that will end up as the “back” of the quilt and is typically one large piece of fabric cut 3-4 inches wider than the quilt top. Place this piece with the print or right side facing up.
4. The last layer will actually be the pieced quilt top. Turn it over with the right side down – the seams will be facing up.
5. Taking both hands and starting from the middle, smooth out all layers trying to remove as many wrinkles as possible. A second set of hands (a nice quilting friend!) also comes in handy here.
6. With all three fabrics stacked on top of one another it is time to baste these layers so all three fabrics stay in place during the quilting process. I have two preferred methods for doing this:
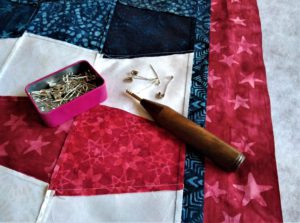
a. Straight Pins – Starting from the middle and moving outward place a pin through all three layers about every 5-6 inches apart.
b. Quilting Safety Pins – Again, starting from the middle and moving outward place a safety pin through all three layers of fabric and fasten about every 5-6 inches apart.
NOTE – Straight pins are somewhat faster, easier and cheaper to use however, the sharp points are visible and as you move the quilt through the sewing machine while quilting it’s very easy to get pricked. The safety pins are curved but are just a tad more time consuming to place but once in, you don’t have to worry about locating the points to prevent being stuck. I use both but I will admit I much prefer using safety pins.
The Sandwich
This next step puts it all together – literally. There is a bit more sewing involved but not much.
Take the quilt sandwich you just pinned together to the sewing machine. Make sure the quilt top is on top with seams facing up. You will use the edge of the pieced quilt top as a guide; sew ¼” from the edge, around all four edges leaving about a 5-6 inch opening along one side. The bottom two layers (the batting and backing) will be extending out beyond this edge – simply ignore that, it will all be trimmed off later.
I have found it easier to start stitching long the middle of one side – about 2/3rd of the way down one side until I reach a corner. Leaving the needle down, through the fabric just left the presser foot and turn the quilt 90° and continue stitching along this side. After rounding the 4th corner stitch only about 1/3 of the length and stop. Where you began stitching should be visible and what you see is a fairly wide opening that is not sewn together. This will remain open to allow all the fabric to be brought through when turning.
NOTE: It is important to back stitch a couple of times at both ends of the opening to prevent the stitches from coming loose and making the opening too wide.
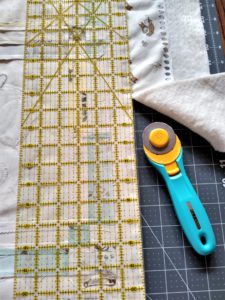
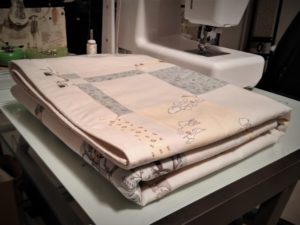
Taking a look at this quilt sandwich it doesn’t look too pretty and you may be asking is this how it is supposed to look? Seams from the quilt top are on the outside, all of the batting is showing and the edges of the backing and batting are uneven but we are about to fix that and even things up. We do this by going back to the cupboard and retrieving a few more items. This time: 1) a rotary cutting mat, 2) rotary cutter and 3) a quilting ruler.
If you used a floor before to make your quilt sandwich, I strongly suggest you find a large tabletop, countertop or another smooth, flat surface to place the cutting mat. It will not only be easier but much safer as the rotary cutting blades are extremely sharp and you will be able to cut more accurately when trimming the edges.
To decide where to trim again, use the edge of the quilt top as a guide. This should be as perfect a square as possible.
Line up the quilt ruler even with the edge of the quilt top. The edges will be longer than the ruler so you want to line up the bottom edge of the ruler with the bottom edge of the fabric. Starting at this bottom right corner with the cutting blade positioned firmly against the edge of the ruler, cut through all layers of fabric. When you reach the top of the ruler, stop and carefully slide the ruler upward keeping the edge aligned with the edge of the fabric and continue cutting until you’ve reached the end of the first side of the quilt.
Turn the quilt, reposition the ruler and continue cutting in this manner until all four sides of the quilt sandwich are trimmed.
Important Tip: When using a rotary cutter ALWAYS cut starting at pint closest to you and roll the cutter away –cutting in ONE DIRECTION only. If a couple of threads are passed over and not cut bring the cutter back down to the starting position and cut again in the same direction. NEVER roll the blade in a back and forth motion – this frays the fabric and creates a ragged edge that is difficult to work with.
First Bite
Now for the fun part – turning the quilt to create a “proper” quilt sandwich!
Holding the quilt with both hands, use one hand to reach inside through the opening and grasp the opposite edge of the quilt and pull out through the opening. Keep working at it until the entire quilt is turned right side out. The quilt top and backing are now facing outward (the right sides aka the” pretty sides” showing) and the batting properly sandwiched inside in between the two print fabrics.
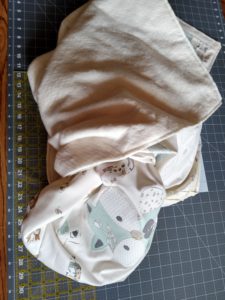
What comes next is an exciting step and the beginning of the long awaited end – getting a glimpse of what exactly the quilt will look like when finished.
Just three more steps and this quilt sandwich will be ready for quilting! Let’s get started!
1. Smooth out the edges and fold the fabric at the opening inward trying to hide the opening. Once both sides of the opening are lined up take the quilt to the ironing board and iron the entire quilt so it lies nice and flat making sure the seam edges are straight along each edge.
2. Return to the opening and again, making sure both sides of the fabric are lined up use several pins to pin the opening closed. You don’t want this shifting while you sew.
3. The last bit of sewing involves doing what is known as top stitching. Using a colored thread that coordinates with the fabric stitch ¼” from the edge around the entire perimeter of the quilt. This not only gives the quilt a nice professional look it closes the opening we made (for turning) and makes it look like an opening never existed.
NOTE: When ironing, No steam allowed – it will cause the fabric to stretch. A mild starch or just a spray bottle of plain water can be used to make ironing all these layers flat paying special attention to the edges.
So far we have covered two of three steps in making a quilt: 1) piecing the quilt top and 2) making the quilt sandwich and added a couple of ingredients – turning and top stitching.
Stay tuned for Part Three! At the end of this last step we can finally say we have a finished quilt ready for our own use or to give as a gift!