

It’s about time.
It’s about time I wrote and published this article about time – specifically time management.
Putting the previous year in the rear view mirror I’m feeling a renewed sense of hope and this hope motivates me to set goals and make plans for the remainder of this year.
While perusing my emails, favorite blogs, group Facebook pages, Pinterest as well as patterns and inspirations saved in various files on my computer it doesn’t take long to begin to get overwhelmed. I love the adrenaline rush of finding that perfect pattern or the beautiful fabric that I can’t live without. This is quickly followed by the rush of singing up for a QAL or receiving word that new baby will soon be arriving and before I can blink twice my energy level is stifled by that “T” word – TIME.
The usual question I ask myself, “what will I do” is soon replaced with, “when will I do all this?” “How will I get it done in time?”
If you are like me and find yourself asking these same questions, then this post is definitely for you.
FIRST THINGS FIRST
1. We all need a place to start and the best place begins with a system to quickly and easily visualize each upcoming task.
Below are two of my favorite go-to systems:
Wall Calendar.

Receiving a wall calendar is a Christmas tradition in our house and one that my husband and I look forward to each year. No matter how advanced technology becomes, as long there is a Christmas, we will be exchanging wall calendars!
I typically favor the folk art themes by Lang however, this year I was gifted with the lovely “The Art of the Quilt 2021” calendar by Weeks Ringle and Bill Kerr of the Modern Quilt Studio. It is described as an “Activity Calendar” and
includes the patterns for the quilt displayed for each month and every pattern is located in a pocket inside the back cover.

As I took this photo, I noticed the quilting the maker used to quilt this beautiful quilt. While the overall fabric pattern consists of simple shapes and solid colors the actual quilting is anything but straight lines – the perfect contrast to the fabric pattern.
While some may think piecing a top like this to be too simplistic, this type of geometric (or Modern) pattern allows you the freedom to utilize any type of quilting pattern you choose. The pattern – even with its various colors and shapes, is basically a blank canvas whe it comes to quilting. And, it is the quilting (by that I mean the actual stitching that sews all three layers of quilt sandwich together) that gives the quilt it’s “personality” – dimension, details and texture. You notice this immediately when you compare a pieced top that hasn’t been quilted to one that has. HUGE difference!

WorkFlowy

To me, this is more than just another productivity app. WorkFlowy appeals to me and my need to make lists. Yes, I’m a “list maker” and this system thinks the way I do. It’s clean with a simple mission: “make lists, not war”.
When I’m struck with one of those “ah-ha” moments with a brilliant idea, I’m able to, at a glance, determine where that idea needs to be filed. It’s easy to prioritize any task and as a task is completed, you can mark it off by drawing line through the listed item. For those times when I fell overwhelmed and or non-productive, it warms my soul to be able to go back and look at the marked through tasks and visually see that I have actually accomplished more than I thought!
A few of my WorkFlowy titles include content creation, SEO, Christmas decor, Christmas gifts, QAL projects and materials list, etc., and is also where I store and retrieve my affiliate links as well as other links such as products to be reviewed.
EVERYTHING IN IT’S PLACE
2. A system to organize each quilt or craft project.
I’m rarely doing only one project at a time. In fact, there are three quilt alongs I’m committed to participating in this year.
I’m currently in the middle of the first one – The Sewcialites Quilt Along – sponsored by the Fat Quarter Shop.
The second one will start in May and the third in August.
The only way to maintain the momentum and motivation to persevere with each project is to have a space dedicated to keep the fabrics, patterns, rulers, notions etc. separate from one another. It also helps to be able to store fabric so it can be just easily put away as it is to take out.
I chose to use a layer cake for the Sewcialites QAL – it’s Lori Holt’s Prim fabric line by Riley Blake –

To help me stay organized and I used this flip open storage box (I think it’s some type of art bin I bought at Joann’s a few years back) to be the perfect way to store layer cake fabric. The depth of this container also allows me to store the extra fabric for the backing, binding and the accent fabrics I will also use for this quilt top.
MAKING EVERY MINUTE COUNT
3. Tools I Can’t Live Without
Late last year when I acquired my new sewing room the first thing I did was take the time to study exactly how I work. My time spent studying interior design taught me that while it is important that a space looks good, it must also function well. A “pretty” space can quickly become tiring and cumbersome when you’re not able to effectively use that space.
For those who ask me, “what do I need to make a quilt”. The answer to a question like this can be as simple as “fabric, scissors, needle and thread” – the only tools available to those very first quilters and sewists. However, for those making a quilt today, the list things of items needed, while it could theoretically be as simple as the list above, actually consists of items that are more specialized and a list a bit more lengthy.
So, as I set out to space plan my sewing room I knew I needed space dedicated to use THE THREE items I use EVERY. SINGLE. DAY.

If you are reading this and this is you are asking what do I need to buy, buy these items first! Start with a small project using pieces that can easily fit on the 12″ square, rotating mat. The 12.5″ x 2.5″ ruler will be used more than any other ruler you will ever own and I have discovered this type of rotary cutter to be the easiest to hold and manipulate.
My sewing room has a large sewing table and two tables/desktops but the one table I use the most is a small TV tray table. It is the prefect size for cutting, measuring and trimming the smaller sized pattern pieces my quilt tops call for. To save time and cut down on time spent picking stuff up off the floor I have attached a scrap bag underneath the right side. Since I’m right-handed, I can cut/ trim and shove the scraps off the right end of the table and into the bag.

As a side benefit of participating in the Sewcialites QAL and tuning into Kimberly Jolly’s tutorials I learned of two additional time savers: Triangles on a roll and her method of labeling the multitude of fabric pieces used to create each of the 38 blocks in the QAL. She demonstrates both items at about the 22:00 minute mark.

Since the “Alphabitties” she uses in her demo are no longer available, you can easily improvise using scrabble squares, plastic alphabets used on a children’s magnetic board (or refrigerator magnet).
I improvised by scrounging through my closet and locating a box of large buttons and a sheet of adhesive letters left over from my scrapbook days – (a craft I basically abandoned as soon as I started!) :

To finish off my list of tools I can’t live without:

I’ve had this Oliso iron for almost 4 years and no…it is not necessary to use this particular iron but you do need to have an iron that is good and dependable. The iTouch technology has me so spoiled that I’m afraid to use a conventional iron ever again! Having an iron that automatically lifts off the surface when you remove your hand from hand grip is as much a time saver as it is safety device. Feel free to read more about it here.
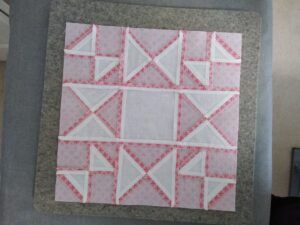
The wool pressing mat holds heat from the iron and transfers it to the underside of your fabric. Makes pressing easier, quicker. Making a block, like the one shown below, with what seems like a hundred seams, a good iron and wool pressing mat ensures the seams lay nice and flat and stay that way until you are ready to sew them to the next block.
I could never have made as many points match up as did or,
 and Quilter's Linen fabric by Robert Kaufman (white)")
have seams open so easily and press flat and neat without the tools listed above.
In summary, the best tools, strategies and systems are those that save you time.
When making purchases for your quilt hobby, first ask yourself, “how will this save me time” and consider this – time saved is also measured by reducing time spent ripping out stitches and having to start over.
An item that ensures an accurate cut in fabric, stitching a consistent seam or keeping you organized will always have a value far greater than it’s monetary cost.
