Moving Past the Square
As a beginning –
intermediate quilter, each day I am more appreciative of the time saving value precut
fabrics have to offer. Sewing together 5″ squares is quick and easy
but there are times when you want to create a pattern with more variety and
visual interest and yet not be so complicated and time-consuming that your
quilt top becomes another layer in your pile of unfinished projects.
I’m always on the
lookout for those interesting patterns that look complicated but in fact are
surprisingly easy to piece together with or without using pre-cuts. The
Disappearing 4 Patch is one such example and instructions for this block can be
found here (link).
However, before getting
into pattern selection I’d like to introduce you to one of my favorite fabric
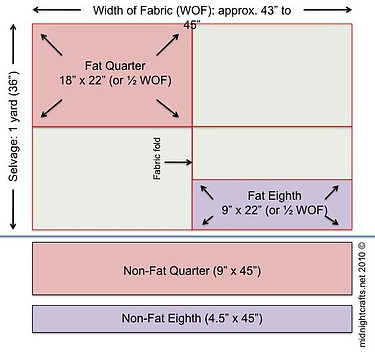
cuts: the fat quarter. The name is derived from the way in which
one yard of fabric is cut. The illustration below shows how a one-yard
cut (36″ x 44″) is divided to yield (4) rectangles each
measuring one quarter of that yard. It’s the 22″ width of fabric
that gives it the name “fat”.
Fat vs. Non-Fat
No dieting here…the fat quarter has just the right amount of thread count and inches. The 18″ X 22″ cut of fabric is such a convenient size to yield a variety of sizes and colors – and it is this variety that creates the visual interest that draws the eye to one quilt over another.
If, during your next fabric shopping spree, you find yourself undecided as to what type of precut fabric to choose I have compiled a short list of items to consider. Chances are, a fat quarter bundle is exactly what you need!
1) The long, narrow fabric cut is ideal when a pattern calls for a variety of shapes or one just one shape in a variety of sizes.
2) Strips cut along the selvage (with the grain) do not lose their shape.
*NOTE* Any fabric cut in the opposite direction or “crosswise” can become very stretchy and as a result will add to the difficulty nesting seams.
3) Fat Quarters are not just for quilting – it is my go-to fabric cut for a variety of other projects: tote bags, organizers, place mats and mug rugs to name a few.
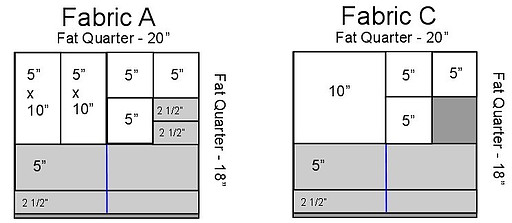
Below are just two examples of how a fat quarter can be cut to piece a quilt top. You may also notice when choosing a pattern that is labeled “Fat Quarter Friendly” the fabric cuts produce very little waste – an important factor when using expensive, high end or limited edition fabrics.
Show Me the Quilts!
Fun and fabulous quilt patterns and fabrics can be found in your
local fabric or quilt store however, this market also has an incredible online
presence. One such resource is allpeoplequilt.com.
A few more of my favorites are the Missouri Star Quilt Co., The Fat Quarter Shop
and The Moda Bake Shop.
I should note that the website for each of the examples listed below can be accessed by simply clicking on the image. Another bonus – the pattern for each of these examples is FREE!
This first example, “Flower Show“, is probably
one of the quickest and easiest quilt tops to make. The print / solid
color is basically a series of rectangles cut into two different sizes. 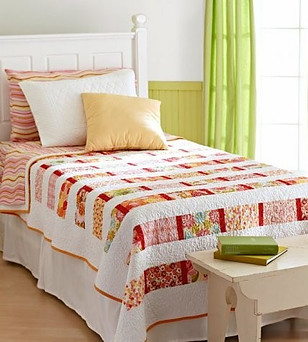
Each of the white background / sashing (white) strips
could potentially be cut into strips the same width as the larger print
rectangles by the entire width of the quilt top.
Simply sew the print rectangle to a solid rectangle – and repeat
this pattern until the desired width is achieved. This would be one row.
Next, sew that patterned row to a long strip of white.
Before you know it, you have strip sets that can be sewn
together and your quilt top is ready for a border!
A second Google search of fat-quarter-friendly patterns placed this wonderful quilt image before my eyes. The quilt was made by Polly @ Pieces by Polly. 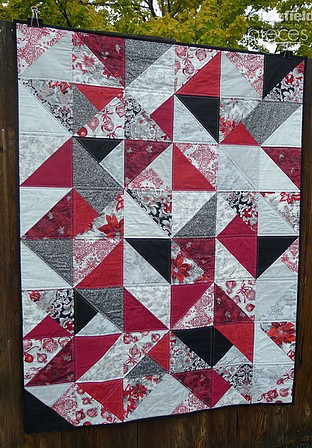
Taking a closer look, each “square” is made by creating a half-square triangle. True, this involves a few more straight cuts with a rotary cutter and ruler but these individual pieces cut from a fat quarter are larger than the typical 5″ square making the creation of each ‘square’ much easier. And these larger sized squares translate into a quilt top that can be pieced together and completed much more quickly.
I have some metallic Christmas fabric similar to this in my Christmas stash – it’s worth taking a look to see if I have enough to give this one a try!
Quilt Fabric is Not Just for Quilts
If you aren’t yet ready for a Christmas project here is one featuring an autumn theme. However, as we all know, the chevron pattern is season-less and theme-less. Do you have scraps of favorite fabrics stashed away in your sewing closet or basket? Here is a great way to use them!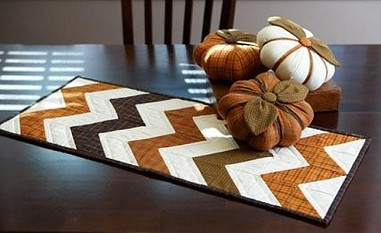
And it’s not necessary to limit yourself to these yummy autumn colors. This pattern can be adapted for any season or holiday. In place of pumpkins make large fabric Christmas ornaments, apples, watermelons, beach balls. Reduce the size of the table runner to a mug rug size – the pumpkins reduced to a pin cushion and you have the perfect gift for the sewist on your birthday or Christmas list. You are only limited by your imagination!
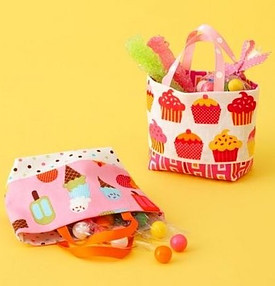
Quilting fabric makes the most adorable mini treat and gift bags! The construction is just as quick and easy and provides a perfect canvas for most any embellishment. These bags require only (2) fat quarters. If a larger bag is needed – for example, a tote bag, just add another fat quarter – or two.
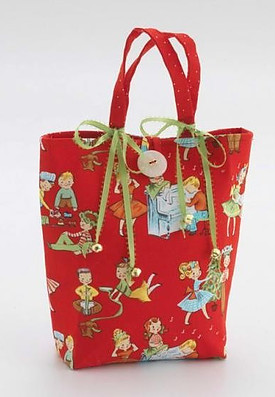
Cut another square or rectangle of fabric and attach to the front for a pocket. Add ribbon, a key chain, buttons, pins, charms or badges. In addition to these bags cute factor is their practicality. They are durable and reusable.
Be Inspired!
The goal of this post is to provide a short but very sweet introduction to fat quarter fabric cuts and the variety of projects that can be created. It is my dream that when you hear the term “fat quarter” you become inspired, get out those lovely fabrics fabrics and create something unique today!
I have recently finished my first quilt and it took me about two years on and off. I really enjoyed doing the work, but I bought a course, which came in magazine format. Each month they send you enough material and patterns for four squares which you eventually sew together with sashing to make a quilt.
I really enjoyed doing the squares, but battled to get the last part done, which was the stitching onto the backing. Took ages. I am keen to now try a smaller project moving forward, and this using of fat quarter fabric is something I haven’t heard about yet. I also like the idea of precut fabric, which I also didn’t know you could get. Time to pay a visit to our local store and see if they have any.
I think I will try those lovely Xmas Treat Bags as they look quick and easy.
Hi Michel
Thank you for your comments and for enlightening me about your quilting experience. I have not heard about a quilting course you describe but it does sound interesting.
I do know what you mean about the actual quilting – it is kind of scary. That is where cheap fabric – even old clothing come in handy. Use those items to practice quilting until you feel comfortable enough to tackle that quilt you worked so hard to piece together!
Interesting post on quilting which is a subject I must admit I don’t know very much about.
You make a good point that quilting is not just for quilts, but I hadn’t realized just how many other things you could make using quilting. I particularly like the quilt made by Polly @ Pieces by Polly, I thought the geometrical design was clever and eye-catching.
Nice, clear explanation of “fat quarters” as well so thanks for that one too. Interesting read, keep it up!
I was at your website looking at another post, saw this one and wanted to take a look as well! Had to figure out what a fat quarter was 🙂 I have always admired people who can have the patience to quilt. It has always looked like such a daunting task. Your simple instructions and the simple patterns you present kind of make it look like it might not be as hard as I had originally thought. I love that flower pattern quilt that you presented in this post. I envision sewing together lines of the fabric pieces and then putting them together to be fairly easy. Wondering how you put the edging on though. What do you use for that?
Hi Lynne and thank you for stopping by!
It took me a while to figure out the “fat quarter” thing as well! One day I was cutting fabric and it hit me – oh my gosh – of course!
I’ve discovered that using fat quarters especially with a pattern designed for that cut of fabric prevents wasted fabric.
As for the edging, that is called the binding and there are a couple of ways to do that. Typically you sew strips together to make one v-e-r-y long strip (say 3″ wide and the length equal to the perimeter of the entire quilt). Attach to the quilt backing, fold over and top stitch in place.
I need to think about video tutorials for many of these posts!
This is very interesting information, I am not really familiar with quilt making, but I do liking having quilt bedspreads I think one has to be an artist to accomplish the perfect designs. Quilt tote bags are now very popular can a tote bag be made from squares I have never seen one made from squares and do you have a design in mind before you start a quilt?
Hi Ruthlyn
Thank you for stopping by!
And yes tote bags are very popular – one of my obsessions! I have made a couple of bags using both squares and half-square triangles. Stay tuned – as soon as I finish my current project (a baby quilt) and post that, I will be doing a tutorial on tote bags!
Reading about quilting makes me want to take it up, but it’s just way too hard. More and more I see articles about quilting, it seems its taking up residence once again. I have a friend who I’m very envious of complete a quilt and it turned out so nice.
She also talked fat quarters and how they can help the quilt along.
My favorite thing here is the gift or the carry bags, I think I’m going to have to try again just for these.
Hi Jag
Thank you for stopping by! When it comes to quilting if you try to be perfectly perfect with every little detail it will seem too hard. The reality is this, it doesn’t have to be hard. The mistakes you make – think of them as learning experiences. At least that is what I tell myself when I have to rip out row after row of stitches!
You have the right idea…start with something cute and simple. You’ll be surprised how quickly you become hooked!