What? Make a log cabin quilt block in just 10 easy steps? Why not? If you have been following along, in previous posts where I concentrated on the very basics of cutting and sewing fabric and discussed the benefits of using pre-cuts as a quick and easy way to learn how to piece together your first quilt top, then you are ready for this.
You have mastered the skills of cutting accurate fabric dimensions and sewing a consistent seam ( typically 1/4″ ) and in all likelihood you are tired of those cute 5″ squares and have begun to ask what other patterns or fabric cuts could I successfully attempt next?
I know this because I had the same question after making my 10th or 12th lap quilt using 5″ precut squares or charm packs.
Digging through my stash of fabrics and downloaded block patterns I came up with this one: a super simple, quick and easy log cabin. This is a classic design and a favorite of just about everyone – quilters and non-quilter’s alike.
The distinct pattern is perfect for using scraps of fabric in contrasting colors – this is what makes the design pop and stand out from many other block designs. I also think it is the gradation in “log” sizes that gives the overall design movement – it visually carries your eye in a comfortable circular motion that adds to its visual appeal.
The images below show how the same fabric using the log cabin pattern pieces but sewn into two different configurations can give the appearance of two distinctly different blocks:
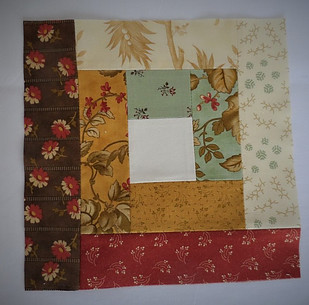
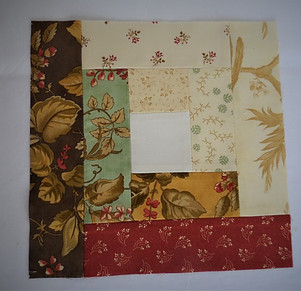
These are just two of probably 200 or more different variations!
Both log cabin blocks shown above were made from a jelly roll from the fabric line “Sweet Cherry Wine” by Blackbird Fabrics. As you can see, this fabric line utilizes a wide range of color contrasts and interesting prints. This particular pattern is from a hand drawn grid using (1) 2″ square and 8 strips with a beginning measurement of 2″ x 1″. Each strip is then cut 1″ longer than each previous (2×2, 2×3, 2×4 etc.).
If you need further proof of the versatility of the log cabin pattern take a look at the image below from Quilter’s Digest:
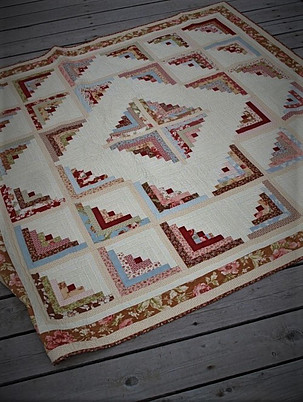
At first glance it looks incredibly complicated but one you break down the individual blocks and begin to see the pattern repeat, you then begin to think, “sure, I can do that!”
Now that you know a little more about the log cabin design let’s dive in go through the process, step by step.
Take a look in your stash and see if you happen to have a jelly roll on hand. The 2 1/2″ wide by 40″ – 42″ cut lengths are the perfect pre-cut to use for a log cabin quilt top. And if the prints are too busy or the colors fall too close together on the color wheel you can always pair that fabric with a coordinating or contrasting solid.
For those of you making a log cabin for the first time I am going to use a different pattern than the one from my example above. It is a simpler pattern and appears to be a little easier to piece and sew.
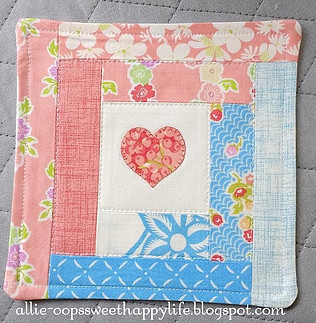
What I have chosen to use is a free pattern download entitled “Valentine Heart Coaster” from Craftsy. It is designed by Allie Hartom of Allie – oops Designs – you can also visit her blog here. This is a super cute fabric coaster that incorporates both applique and log cabin piecing and measures 6″ square when finished.
This particular pattern is new to me so I’m going to sew this block together as I write up this tutorial. The pattern calls for a heart applique in the middle of the 3″ square but since it is almost fall I’m going to choose an apple, pumpkin or leaf applique instead.
So Let’s begin!
Step 1 – Choose fabric for both the log cabin strips and at least an 8″ square for the backing.
Step 2 – Choose applique design
Step 3 – Cut fabric into the following dimensions:
Square: 3″ x 3″
Strip #1 : 1 1/2″ x 3″ Strips #2 & #3: 1 1/2″ x 4″ Strips #4 & #5: 1 1/2″ x 5″
Strips # 6 & #7: 1 1/2″ x 6″ Strip #8: 1 1/2″ x 7″.
Step 4 – Applique design onto middle 3″ square
Step 5 – Sew the 1 1/2″ x 3″ strip to the bottom of the 3″ square (right sides together) then press the seam open.
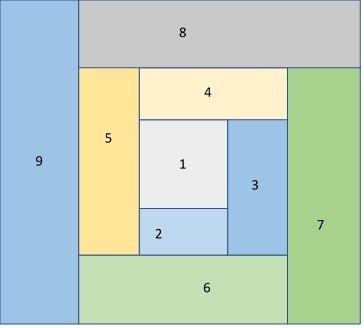
Step 6 – Continue in a clock wise fashion attaching a strip (in the order given) then ironing the seam open, attach a strip, iron open etc., until all 8 strips are in place forming a square.
A diagram of the process and the numerical order in which each strip is attached is shown below:
Step 7 – Cut an 8″ or so square of batting material and sandwich between the pieced top and backing making sure the wrong sides of the fabric are facing outward.
Step 8 – Stitch around the quilt sandwich leaving a 3″ or so opening then turn inside out. With the right sides of the fabric showing fold the edges of the opening inward and pin.
Step 9 – Top stitch around the entire square 1/4″ from the edge
Step 10 – Press and admire your handiwork!
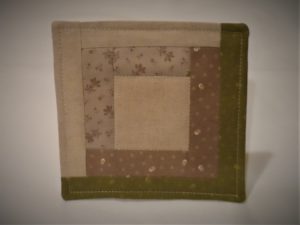
Below is my block using the pattern by Allie-Oop:
This is the front
Here is the back
As discussed earlier, this pattern has so many possibilities. Fabric choices are endless but when the dimensions of the squares and fabric strips are cut a bit wider or longer the result is a block that is larger and a larger block has many other possibilities:
1) Mug Rug
2) Placemat
3) Mini quilt
4) Doll quilt
5) Pieced together with other large blocks to make a quick and easy full sized quilt.
Once you have finished your log cabin block leave a comment below and include a link where we can locate and admire your handiwork! Be sure and include if this was your first log cabin block as well!
Very nice post. I personally do not do any quilts but I love them. You have a very detailed and well informative post here for any fan or someone looiking for more information on quilts. I also love the patterns and fabric you chose for your projects, very nice! Thank you for sharing.
Hi Andrea
Thank you stopping by and for your comments! The main goal of my website is to give encouragement to those with any interest in quilting .
This is a really easy to follow guide for beginners. It inspires me to try quilting, which I always thought would be too difficult.
This is a very easy guide for beginners. It inspires me to try quilting which I always thought would be too difficult. Perhaps pictures of each step would be useful for people who who no previous sewing knowledge. Is there any particular material preferable for quilting? I would be a complete newbie and would have no idea what materials and equipment I would need but I think it would be a very creative hobby.
Hi Jenny
Thank you for stopping by and thank you for your comments! My goal is inspire and encourage others interested in quilting and so glad my post inspired you.
I have a list of tools in a much earlier post but basically you need a sewing machine, thread, pre cut fabric, pins and iron – this the absolute minimal requirements.
When it comes to quilting fabric I do prefer high end fabrics from manufacturers such as Moda, Benartex, Andover, etc. However, for the complete newbie, I would use cheaper, 100% cotton fabric until you learn the basics!
I’m not a quilter, but more of a person who sews. Although I’ve always had my eye on quilting. Most quilters I know including my mother make it look so difficult.
Many a times I have tried quilting in the past, but have given after putting a few minutes into it. I wish I could invest more time, who knows maybe I will come up with something unique and cute.
I like how you have made this guide for newbie like me, who quite possibly may try it again. I think sometimes our best learning comes from online.
Hi Jag
I hope you do give quilting another try. It isn’t so much difficult as it is time consuming and if a project can’t be completed in short amount of time people will just give up on it.
Like many tasks, once you break things down into bite-sized pieces it becomes more manageable and appears to be more doable.
Try a small mini quilt first then post a picture here! I would love to see what you come up with!
First, this is a great topic for beginning designers. My daughter is learning to sew; she has two sewing machines and no fabric. I will have my daughter refer to this site as she deems necessary.
Secondly, the content is easy to understand although I have never sewed anything a day in my life. I really think I can sew a quilt now. You and my daughter have inspired me to sew, now I know the basic and what to look for. Its always great to have a starting point when learning something’s new.
And although my daughter wants to be a food designer (desserts and foods for events), sewing is definitely a skill all us mothers need.
I really enjoyed your site it was as fun to read and kept me engaged. I also shared your site to my Google+ and saved your site in my browser, so I can reference the site at a later time.
Thank you for this site, it is very helpful and will definitely be a great reference in our sewing endeavors.
Hi Lakesha
Thank you so much for your comments! I am so glad you found this information useful and inspiring – after all, that is the whole purpose of my website!
And many thanks for sharing this on your G+ page! Wow!