What Problems?
Who has a problem with the easiest part of making a quilt?
Have you ever wrestled with your quilt back and want to avoid the same mistakes I made? Read on to learn my solution.
I can’t say I’ve never encountered a problem when it comes to backing a quilt but I’ve never encountered a problem anything like what I encountered with the current quilt I’m making.
In the image above, the overall size of the quilt turned out to be a little larger than I planned and as a result, the amount of fabric I had allotted for the back was not enough. Luckily, I had some cute contrasting fabric and was able to make a border to add to the perimeter of the backing. After it was quilted, the overall appearance of the back looks surprisingly intentional.
New Quilt – New Problems
With this quilt design one would expect difficulties to occur making the top. It has many moving parts and a greater potential for things to go wrong. Until today, I considered it to be the most difficult aspect of this project.
But no, not this time. The top was a breeze. My Cricut Maker allowed me to save time by multi-tasking. While Cricut did the cutting, I was free to sew, iron or grab a snack. The quilt top was completed in record time.
When time came to make the backing, the whole project went off in an entirely different trajectory. Sifting through the pile of fabric I quickly discovered I did not have enough of the fabric I wanted for back. Talk about being blind sided. A panicked glance at the clock and the calendar told me I was running as short on time as I was fabric.
Now, the wheels of creativity were turning and turning fast. It must have been the momentum of those turning wheels that caused the light deep withing the fold of my brain to finally turn on. Sure, it was a good week or so too late however, the light did come on!
And the “light” that finally came on was the ever elusive Quilt-As-You-Go (QAYG) light.
I recently talked about making a quilt using the QAYG technique. In fact, if memory serves me, I had stated in that article I would be making my next quilt using this technique.
So, what happened?
The short answer: A lack of focus and an inability to make a final decision about any aspect of this quilt until it was almost finished.
In my defense, when I started this quilt, I didn’t anticipate a huge problem deciding how to do the back. I had a confident, “I’ll figure it out later” attitude. I’m sitting in front of my machine, my feet firmly planted on the ground, my hands merrily sewing away thinking, “I’ve got this”. When in reality I was, the whole time, flying by the seat of my pants.
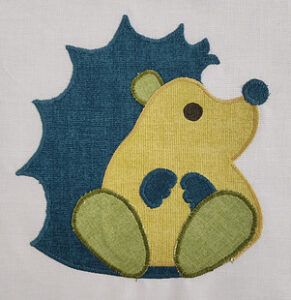
And, it’s not like this was my first quilt or even the first time making this pattern (Woodland Critters by Avery Lane).
An applique pattern like this will consume almost all my thoughts and time, to the extent that I don’t give the time and attention the quilt back deserves.
Lessons Learned
Here is my first lesson:
1) If you do not QAYG, make the back from ONE solid cut of fabric. I know, this is quilting 101 and 99% of all quilters would never think of doing anything different. And 99% of the time I don’t break this rule, but today I’m the 1%.
Second Lesson Learned:
2) When you have blocks that can standalone – meaning, they are not interlocking. I’m often asked if a wedding ring can be quilted using the QAYG technique. The short answer is no. Other pattern types such as a chevron or bargello cannot be quilted as you go without some serious modifications to the pattern.
Third Lesson
3) Do not try to piece the quilt back unless you have a LOT of extra time and plenty of extra fabric to work with. I had neither but again, when you’re flying by the seat of your pants, details such as those don’t come into full view – until you’re heading for a crash landing.
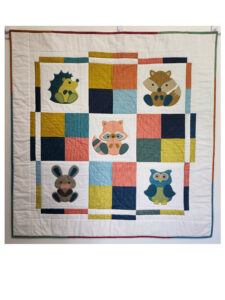
Here is the finished top:

This isn’t the type of quilt top where you would use an all-over quilting design. The applique blocks need to be treated differently than the four patch blocks but each block is the same size and shape so QAYG would work perfectly. Each block can also be easily attached with or without sashing.
My first solution was to use the left over fabric scraps and fat quarters to create a large 9 patch block with a whole border.
This would have been a good solution had each of the 9 patch blocks measured the same or a bit larger than each of 9 corresponding blocks on the front. AND, if those blocks on the back could be perfectly aligned with the front.
This was the dilemma – aligning the back, as one piece, with the front with the batting sandwiched in between. Batting that is thick, opaque with NO transparency whatsoever. Aligning all those front seams with those in the backing – an obstacle I truly thought I had overcome. It’s possible I did however, fabric being fabric, there are shifts that occur when multiple layers are moved over a footplate and under a needle.
But I gave it try anyway. My thinking, “If it’s a little off it won’t be that noticeable and any mistake can be “quilted out”, right?
Wrong. This entire back became a mistake that could not be “quilted out”.

I almost pulled it off… Just another inch or so and my pieced quilt backing experiment would have kinda, worked.
Looking at the top, everything looked great. Turning the quilt over to see the back was not so great. It was almost shocking to see such a disastrous display of misplaced stitching.
As I looked, my eyes trying to “fix” the offset stitches was also the moment the QAYG light came on. Quilting each applique and four patch block as a separate unit then sew all the blocks together. That is the only way to have a specific quilt motif align perfectly with it’s corresponding top block.
Ugh.
Huge lesson learned…so huge in fact, there is no number large enough to assign to it.
More Questions Than Answers
But wait, there are more lessons to come and decisions to make.
Q: What do I do now?
A: Consider my options – fix or start over.
Q: Can this be fixed?
A: Probably so but I’ll need to research how.
Q: Has anyone else ever had to deal with a quilt back that looks horrible?
A: You do what other quilters have done when they want to submit a quilt for a quilt competition but the back looks horrible…cover it up!
It was not until I needed to find a way to salvage the mess I’d made that I was aware of the trick used by professional quilters to create a perfect backing to their perfect quilts. They simply make another back to cover the original.
Q: If I decide to make another back do I have enough fabric?
Q: Do I have time?
Answering either yes or maybe to the above questions, I enthusiastically embarked on the next leg of this journey – making a second quilt back.
I took those larger pieces of fabric, cut them all into 6″ squares – 81 squares to be exact, and sewed the whole thing together to make one big fabric panel approx 48″ square. Again, I’m still flying by the seat of my pants so no exact measurements were taken but my primitive math skills and a couple of rough estimations allowed me to create a backing this IS the right size!

This whole idea seemed a little sketchy to me at first. I’ve never, ever covered a quilt back with another quilt back but then I never needed to. Looking, and looking again and again looked at this mess all the while trying to “fix” it in my mind. I would tell myself, “It doesn’t look all that bad”… “no one will notice it”… “It’s just the back”…
In the end however, no amount of dialogue was enough to convince me giving this quilt as a gift, with such a horrible looking back, was acceptable.
So, with the towel thrown in, and a new resolve to make the finest lemonade from this gigantic lemon, the new back was basted onto the back. The “quilting” was accomplished by stitching in the ditch around the perimeter of each 10″ square from the front.
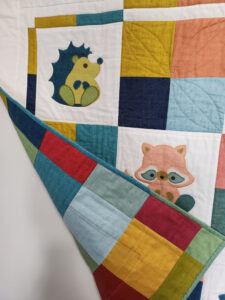
Here is the back now:

The image shows the work in progress. It’s not perfect but much better. At least, from a distance, the stitching isn’t as noticeable. After it’s washed a couple of times it should look from just fine from either side.
Final Thoughts
While doing the stitch in the ditch to attach the new quilt back it became obvious that what “drape” properties this quilt had been lost with the addition of this added layer of fabric. Now it is rather stiff and a little heavier…and another decision to be made.
Q: Leave this as a quilt or make it into a wall hanging or play mat?
A: Why not all three.
I added tabs across the top to allow a rod to be threaded through and hung on the wall. The tabs lay flat so they aren’t visible when not in use. This gives the option to use as a wall hanging, a play mat or a quilt!
In summary, if you are making a quilt with a detailed top and a complicated back, QAYG is THE way to go!
What quilting mishaps were you able to salvage?