New Year – New Checklist!
Here we are…near the middle of January. A new year with the promise of new beginnings.
And those darn resolutions! You open a notebook at take a look at your wish list of things to do this year. There it is! Learning to quilt is in the top 5!
So, you have it in writing! Making a quilt is the “definite to-do” list but where do you start?
The Journey Begins
Since my last post my time has been divided between creativity and contemplation.
And as I create with my hands putting into practice newly acquired skills and techniques, my mind was almost equally focused on the beginner sewist or quilter. What information do they need to start their quilting journey. And, of equal importance, how to be successful. Many people start walking down this path and before reaching the half-way point become discouraged. They don’t just walk; they turn and run – at break-neck speed, back to the start.
Thinking back on my own journey and the numerous starts and stops along the way, I feel if I had had better guidance/ advice/instruction my own journey may have been more positive.
Through it all, one unwavering desire and passion remained with me – to create with fabric.
The information I share here on this site is actually for quilters and sewists of all skill levels. For those who share this common thread – to use fabric to make pretty things.
That Was Then – This Is Now
In recent years I have observed a shift in priorities. Many are taking an interest in handmade, one-of-a-kind projects. They see a quilt at a quilt show or bag at a craft fair and want to be able to create those same items but are not sure how to begin the process.
The market has become so saturated with hundreds of products, fabric lines, video tutorials, etc., that the beginning sewist/quilter can become easily overwhelmed. Not to mention all the information available online – this quilter recommending this, another recommending something entirely different. Often products are recommended based on the prospect of the content creator being paid for their endorsement.
In the name of “choices” the market presents the consumer with a double-edged sword. True, an abundance of products, services and information is readily available however, this abundance has the potential to generate an environment of confusion. Which product is best? What is the most popular technique? Who has the most reliable information? Can I even afford this? What if I don’t have the skills to be successful?
Anyone Can Quilt but Quilting Isn’t for Everyone
Yes, I said it.
There is a level of commitment inherent in the entire process. The end product is the result of several days/weeks – even months – of planning, cutting, stitching, ripping out and re-doing seams.
For those of us who have experienced the highs, lows and everything in between and continue, relentless, in our craft it is not so much about the end product but the process.
Being able to enjoy and appreciate the process is what makes every quilting effort a success.
And to that end, I have created the Ultimate Purchase Checklist. The list is derived from the items I personally use. Every. Day. After approximately 10 continuous years, are tools I absolutely cannot live without.
In addition to getting your journey off to a good start, my intent is to prevent you from wasting your precious and often limited time and hard-earned money on purchases that end up in a box or drawer collecting dust. To be successful means having the “Right tool for the right job”.
The *star* beside the top 7 items are those that are not negotiable. They are “must-have” items you will need to successfully begin your quilting/sewing journey.
Below the list I explain, in detail, why I chose that particular item or brand and why.
So, let’s dive in.
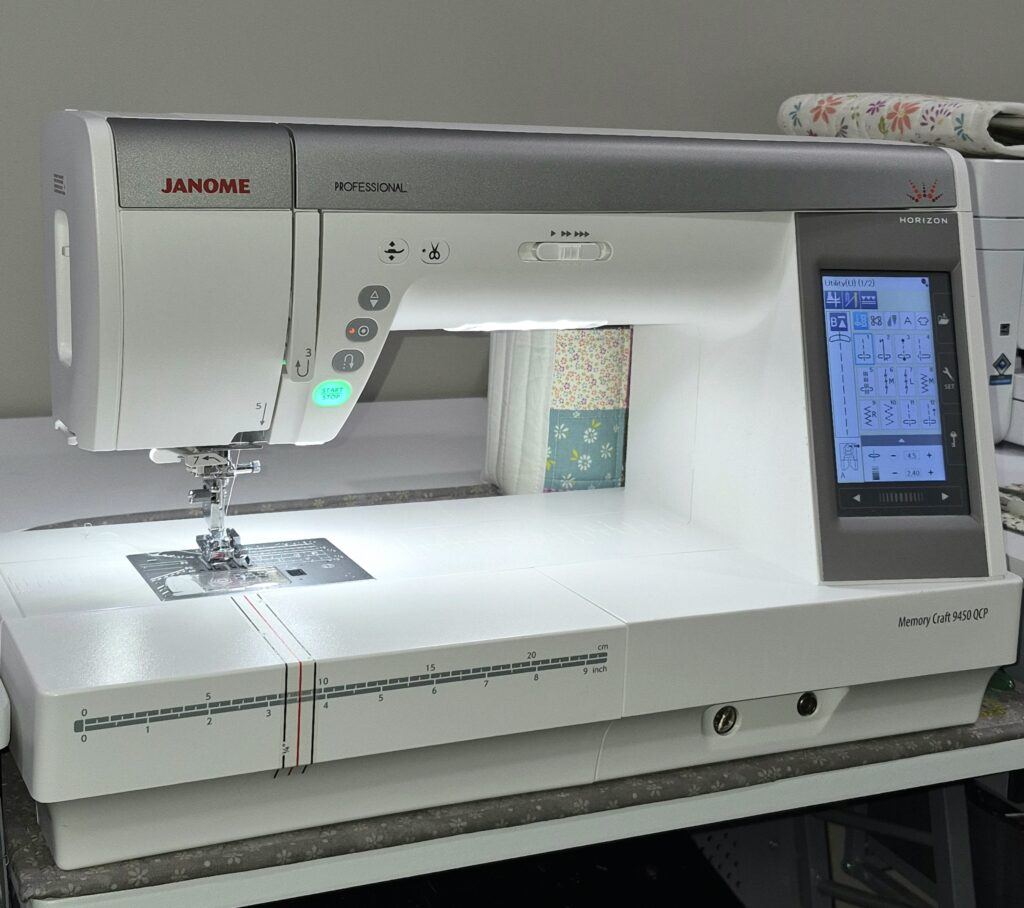
- Sewing Machine.
- I happen to own a Janome but in reality, pretty much every machine on the market is a good one. If you will primarily be sewing quilts or garments choose a machine that has a large throat space. My 9450 is 11″ and I personally could not live without it.
- If bag making is your thing, a straight stitch machine like the Juki 2010 is a real workhorse and, like so many sewists, may end up being the only machine you’ll ever need!
- If you plan to ever want to do machine embroidery, bite the bullet and buy a machine that does that too. Purchasing a second machine that does only embroidery may be an option as well.
- Putting all bells and whistles aside, the main piece of advice I give anyone who asks is this: “Buy the most expensive machine you can afford”. Yes, you do get what you pay for and if you are going to be creating with fabric for years to come, it will be money well spent.
- Cutting Mat
- Large – I started with a basic Fiskers mat measuring 12″x24″ but had to go up to a 24″x36″. My only regret was not knowing about Creative Grid mats. Fiskers is not a bad product, but Creative Grid mats last longer and are easier on your rotary blades. If at all possible (and I realize space and tabletop size may be issue).
- Small – The Creative Grids rotary cutting mat (14″ square) is worth it’s weight in gold. I’ve used it pretty much every day for the past 5 years and it still looks brand new. I have a smaller Olfa rotary cutting mat (12″ square) that has been repurposed to provide a flat, solid surface on a wire shelf.
- Rotary Cutter
- This is an item that is as essential as water. And like water, there as many different types as there are brands of bottled water. Probably the best advice is to try out different brands and see which you prefer.
- Before I understood the differences in rotary cutters, I purchased a Fiskers. It didn’t take me long to begin my search for that “better mouse trap”. A couple of purchases and about 7 years later I discovered the 45″ rotary cutter by Quilter’s Select. It is a bit heavier than the others I have found that extra weight adds a level of stability that not only makes it easier to cut but making long cuts in fabric is much more accurate.
- The 45″ rotary cutter is the middle size and the one you will use about 98% of the time. You will use the 60″ only when cutting several layers of fabric thickness. I have the small 30″ but have only used it to cut rounded corners with a fairly large arc.
- Blades. Buy them on sale and as many as your budget will allow. You will never have too many! Be aware of sales gimmicks – “These last for years…the blade never dulls or dulls much slower than ____”. No blade will last as long as you want it to. I have seen a rotary blade sharpener advertised; however, I have never used one nor do I know of anyone else that has.
- Scissors
- This subject is as contentious as the one on rotary blades.
- There are scissors for every budget but again, you do get what you pay for. We are, again, talking about blades that in time, will dull.
- To begin with, buy three pair of scissors – one for fabric and the other for paper and third, a small snipping tool. Keep the blades clean and sharpened and they will serve you well until you’re ready to upgrade.
- Iron / Ironing Board
- Everyone has or develops a favorite iron. I will say, at least as far as I’ve experienced, today’s irons do not compare with our grandmother’s heavy GE iron from the past. Yes, they get hot but because of their lighter weight, require more passes to flatten fabric. They have a few bells and whistles but are not known for their efficiency. (For any reader who can dispute this, I’d love to hear from you and tell me what iron you use that lives up to reputation of yesterday’s iron!)
- For the past 8 or so years I’ve been using an Oliso. It took some getting used to but now that I also have the smaller version Oliso MP3 Pro Project iron, I think I’ll hang onto both for a while.
- I’m not endorsing one iron over another but the bottom line is this – you will be using your iron as much, if not more, than your sewing machine so buy one you love.
- Rulers
- To begin with I suggest these three: 24″ x 6″; 18″ x 3 1/2″ and 12 1/2″ x 2 1/2″. 36″ x 6″ (instead of the 24″ x 6″) is a great option. I chose the 24″ length as this is the same width as my large cutting mat.
- Here, in my honest opinion, the brand of ruler you choose does make a difference. I have Omnigrid/Omnigrip and Creative Grids and I’ll choose the Creative Grids ruler as often as I can.
- If you’re like me, as time goes on you will acquire many, many more rulers – some you will use a lot, and some not so much. When these babies go on sale, I grab as many as I think I will use!
- 50 wt. Cotton Thread
- This is the most commonly used thread weight for quilting. It’s strong and works well with most machine needles. Aurifil just happens to be my favorite.
- I’ve specified cotton as opposed to polyester or cotton/poly blend. Not that you can’t use polyester or poly blend, but the polyester is not a natural fabric. Basically, it is plastic and over time will “cut” through the fabric where cotton will not – at least not as easily.
- – 11 Stylus, Seam Ripper, Fabric Glue and Pins/Clips
- Of these items, the seam ripper might should have been placed with other “non-negotiable” items. This will, I’m sorry to say, will be used – a LOT. The stylus, glue and pins or clips are needed to keep the fabric pieces in place however, there are times when I don’t use anything. It largely depends on the project – not everything to be sown has to be lined up perfectly perfect and your hands can hold things just fine.
Below are images taken in my sewing room showing the actual items I Not only use every day, but could not function without!

A final word regarding purchases – and this holds especially true when making a major purchase such as a sewing machine. Resist the temptation to buy from a big box store or online (unless the purchase is from an independent retailer).
Purchasing from your local, independent dealer – mine is the Missouri Sewing Machine Co. can offer guidance, knowledge and incentives you cannot find elsewhere. As a bonus, MSMC offers free lessons with the purchase of a machine. It’s the type of store where I can spend all day and be ready to return the next day as soon as the doors open! They have many machines set up that allow you to take a test drive with a wide variety of brands, so you have a better chance of buying the machine you love and not one you learn to put up with. Your independent dealer will also service and repair your machine – that alone is something you can’t put a price tag on.
Stay tuned for a follow-up post designed to take you beyond the basics of shopping and into the exciting world of sewing!
If you found this Ultimate Purchase Checklist to be useful or if you would like to offer suggestions that would be beneficial to the beginning (or seasoned) sewist/quilter, I’d love to hear from you in the comments.